上一节我们完成的棋盘的布署和绘制,棋子自然是接下来的重要内容了!
CustomPaint 可以将绘制内容分成背景和前景两款部分,上一节中,我们在 CustomPaint 中将 painter 指向了我们的 BoardPainter 对象,它正是用来指定背景 Painter 的。
本节提要
思考棋子与棋盘的关联
讨论象棋「局面」的表示方式
使用 Canvas 绘制各个棋子
规划局面的管理工具类
应用三方字体美化棋子
布署棋子组件
CustomPaint 还可以指定一个 CustomPainter 类型的 foregroundPainter 对象,用于在背景之上绘制前景内容。我们正是要用它来绘制棋盘上的棋子。
在 lib/board 文件夹下,我们新建一个名叫 pieces-painter.dart 的文件:
		import 'package:flutter/material.dart';
		import 'board-widget.dart';

		class PiecesPainter extends CustomPainter {
		  //棋盘的宽度, 横盘上线格的总宽度,每一个格子的边长
		  final double width, gridWidth, squareSide;
		  final thePaint = Paint();

		  PiecesPainter({@required this.width})
		      : gridWidth = (width - BoardWidget.Padding * 2) / 9 * 8, //计算总宽度
		        squareSide = (width - BoardWidget.Padding * 2) / 9; //计算每个格子的边长

		  @override
		  void paint(Canvas canvas, Size size) {
		    //
		  }

		  @override
		  bool shouldRepaint(CustomPainter oldDelegate) {
		    //
		    return true;
		    // throw UnimplementedError();
		  }
		}
由于棋盘上的网格宽度、棋盘小格子的尺寸等信息,在棋盘的网格和棋子绘制中是统一的,因此我们对之前的代码做一点面向对象的重构 — 把相同的逻辑抽到到一个基类中去。
在 lib/board 文件夹下新建一个 painter-base.dart 文件,建立 BoardPainter 和 PiecesPainter 的共同父类 PainterBase 类:
		import 'package:flutter/material.dart';
		import 'board-widget.dart';

		//创建共同使用的基类
		abstract class PainterBase extends CustomPainter {
		  //棋盘的宽度, 横盘上线格的总宽度,每一个格子的边长
		  final double width, gridWidth, squareSide;
		  final thePaint = Paint();

		  PainterBase({@required this.width})
		      : gridWidth = (width - BoardWidget.Padding * 2) / 9 * 8, //计算总宽度
		        squareSide = (width - BoardWidget.Padding * 2) / 9; //计算每个格子的边长

		}
		class BoardPainter extends PainterBase {
		  BoardPainter({@required double width}) : super(width: width);
		  ...
		}
与此类似,使 PiecesPainter 类也继承自 PainterBase 类:
		class PiecesPainter extends PainterBase {
		  PiecesPainter({@required double width}) : super(width: width);
		  ...
		}
棋盘局面表示
在绘制棋子的之前,有一个问题我们需要优先考虑:棋盘上的棋子位置是活动的,我们如何表示当前局面的棋子分布?为了应对这个问题,我们需要建立一组模型,用以表示棋盘上的棋子类型、颜色、位置分布等数据。
我们建立 lib/cchess 文件夹,将与中国象棋逻辑相关的实现代码限制在此文件夹范围内。
在 cchess 文件夹下,我们建立cc-base.dart 文件,在其中先建立代表棋盘两方的 Side 类和代表棋盘中的棋子的 Piece 类:
cc 代表 Chinese Chess,以后遇到的 cc 都遵循这个约定。
		class Side {
		  static const Unknown = '-';
		  static const Red = 'w'; //中国象棋理论按国际象棋:'w'是国际象棋中的 white 侧,在中国象棋中没有白方,指代红方
		  static const Black = 'b'; //表示黑方

		  /* 返回哪一方 */
		  static String of(String piece) {
		    /*
		    中国象棋用大写字母代表红方的棋子,用小定字母代码黑方的框
		    RNBAKCP 依次代码的棋子为:车马象仕将炮兵
		    */
		    if ('RNBAKCP'.contains(piece)) return Red;
		    if ('rnbakcp'.contains(piece)) return Black;
		    return Unknown;
		  }

		  /* 判断是否同一方 */
		  static bool sameSide(String p1, String p2) {
		    return of(p1) == of(p2);
		  }

		  /* 交换红黑下棋方 */
		  static String oppo(String side) {
		    if (side == Red) return Black;
		    if (side == Black) return Red;
		    return side;
		  }
		}

		/* 棋子类 */
		class Piece {
		  static const Empty = ' ';

		  static const RedRook = 'R'; //红"车"
		  static const RedKnight = 'N'; //红“马”
		  static const RedBishop = 'B'; //红”相“
		  static const RedAdvisor = 'A'; //红”仕“
		  static const RedKing = 'K'; //红”帅“
		  static const RedCanon = 'C'; //红”炮“
		  static const RedPawn = 'P'; //红”兵“

		  static const BlackRook = 'r'; //黑”车“
		  static const BlackKnight = 'n'; //黑”马“
		  static const BlackBishop = 'b'; //黑”象“
		  static const BlackAdvisor = 'a'; //黑”士“
		  static const BlackKing = 'k'; //黑”将“
		  static const BlackCanon = 'c'; //黑”炮“
		  static const BlackPawn = 'p'; //黑”卒“

		  static const Names = {
		    Empty: '',

		    //红方
		    RedRook: '车',
		    RedKnight: '马',
		    RedBishop: '相',
		    RedAdvisor: '仕',
		    RedKing: '帅',
		    RedCanon: '炮',
		    RedPawn: '兵',

		    //黑方
		    BlackRook: '车',
		    BlackKnight: '马',
		    BlackBishop: '象',
		    BlackAdvisor: '士',
		    BlackKing: '将',
		    BlackCanon: '炮',
		    BlackPawn: '卒',
		  };

		  static bool isRed(String c) => 'RNBAKCP'.contains(c);
		  static bool isBlack(String c) => 'rnbakcp'.contains(c);
		}
在 Side 类中,行棋的两方我们各用一个字符表示:'b' 表示黑方,'w' 表示红方,用 '-' 表示未知行棋方。
由于中国象棋通用引擎协议—UCCI 中很多规定沿袭了国际象棋的引擎协议,所以使用 'w' 表示红方,这是沿袭了国际象棋对 White 方的表示。
在 Piece 类中,我们各用一个字母来表示棋盘上的棋子。
多数情况下,我们用车、马、相、士、将、炮、兵的英文单词首字母表示对应的棋子。有一个例外,那就是代表「马」的单词 Knight 和代表「将」的单词 King 都是以 'K' 开头,所以约定了用 'N' 或 'n' 来代表「马」,'K'或'k'代表「将」或「帅」。
此外,棋软开发者还约定,黑棋用小写字母表示,红棋用对应的大写字母表示。
这样一来,棋盘上 10 横 9 纵共 90 个交叉点,我们就可以用一个数组来表示棋盘上的棋子分布了。
「棋子分布」加上「当前轮谁走棋」两个信息,共同构成了一个象棋的「局面」信息。
我们在 lib/cchess 文件夹下新建一个 phase.dart 文件,表示象棋的局面:
import 'cc-base.dart';

		/* 局面类 */
		class Phase {
		  String _side; //当前行棋艺方

		  List _pieces; //10行9列(中国象棋的棋子放在纵线交叉点上,棋盘上总共有10行9列的交叉点位,一共90个位置)

		  get side => _side;

		  trunSide() => _side = Side.oppo(_side); //交换行棋

		  /* 查询10行9列的某个位置上的棋子 */
		  String pieceAt(int index) => _pieces[index];
		}
结合局面信息,我们就可以回到我们的 PiecesPainter 中,进行棋子的绘制动作了。
绘制棋子
在基类 PainterBase 中,我们已经计算好了网格的尺寸,这些尺寸是根据 BoardWidget 提供的宽度自动计算出来的。为了让棋子也随着棋盘的大小同步变动,我们约定:
棋子的宽度 = 棋盘一个格子的宽度 * 90%
在 PiecesPainter 类中,我们添加表示棋子宽度的字段 pieceSide,此外再添加表示局面的 Phase 实例:
import 'package:flutter/material.dart';
		import 'painter-base.dart';
		import '../cchess/phase.dart';

		class PiecesPainter extends PainterBase {
		  final Phase phase; //表示棋局面
		  double pieceSide; //棋子的大小
		  PiecesPainter({@required double width, @required this.phase})
		      : super(width: width) {
		    pieceSide = squareSide * 0.9; //计算棋子的大小
		  }

		  @override
		  void paint(Canvas canvas, Size size) {
		    //
		  }

		  @override
		  bool shouldRepaint(CustomPainter oldDelegate) {
		    //
		    return true;
		    // throw UnimplementedError();
		  }
		}
现在绘制棋子需要的一切数据就绪,我们开始绘制工作吧。
我们在 PiecesPainter 类中添加静态方法 doPaint:
 static doPaint(
		    Canvas canvas,
		    Paint paint, {
		    Phase phase,
		    double gridWidth,
		    double squareSide,
		    double pieceSide,
		    double offsetX,
		    double offsetY,
		  }) {}
在这里使用静态方法的原因,前文已有表述,主要考虑到将来需要在内存画布绘制棋盘时重用此方法。
接着,我们在 PiecesPainter 类的 paint 方法中调用 doPaint 方法:
 @override
		 void paint(Canvas canvas, Size size) {
		   //
		   doPaint(
		     canvas,
		     thePaint,
		     phase: phase,
		     gridWidth: gridWidth,
		     squareSide: squareSide,
		     pieceSide: pieceSide,
		     offsetX: BoardWidget.Padding + squareSide / 2,
		     offsetY: BoardWidget.Padding + BoardWidget.DigitsHeight + squareSide / 2,
		  );
		}
绘制一个棋子的工作大致有以下几个步骤:
- 绘制棋子棋子大小相同的圆形阴影,阴隐要放在其它绘图之下;
- 区分棋子的颜色,填充指定大小的圆
- 区分棋子的颜色在代表棋子的圆外添加一个圆圈边框
- 在棋盘的圆圈中间,区分颜色写上代表棋子的文字
有了代表棋子分布的数组,我们的绘制工作就是对棋盘上存在于指定位置的棋子,分别执行一轮上述的棋子绘制动作。
为了让绘制动作逻辑更清晰,我们将绘制动作分解成两步:
- 第一步我们确定各个棋子以及其所应出现的位置,并把它们添加到一个列表中
- 第二步我们对已标定位置的每一个棋子棋子执行绘图动作
开始前还有一点准备工作:我们在 PiecesPainter 之上添加一个绘制专用的 Stub 类:
/* 绘制 */
		class PiecePaintStub {
		  final String piece;
		  final Offset pos; //棋子位置
		  PiecePaintStub({this.piece, this.pos});
		}
然后我们执行绘制动作的第一步 — 计算好各棋子位置:
static doPaint(
		    Canvas canvas,
		    Paint paint, {
		    Phase phase, //局面
		    double gridWidth, //横盘上线格的总宽度
		    double squareSide, //每个格子的边长
		    double pieceSide,
		    double offsetX,
		    double offsetY,
		  }) {
		    final left = offsetX, top = offsetY;

		    /*
		    在 Flutter 中绘制阴影,需要先将阴影对象添加到一个 Path 中
		    我们绘制棋子时,可以将每个棋子的阴影路径一次性添加到 Path 中,然后一次绘制所有棋子的阴隐
		    */
		    final shadowPath = Path();
		    final piecesToDraw = [];

		    for (var row = 0; row < 10; i++) {
		      for (var column = 0; column < 9; i++) {
		        final piece = phase.pieceAt(row * 9 + column);
		        if (piece == Piece.Empty) continue; //坐标上为空,没有棋子

		        var pos = Offset(left + squareSide * column,
		            top + squareSide * row); //根据行列位置,计算棋子的位置

		        piecesToDraw.add(PiecePaintStub(piece: piece, pos: pos));

		        /* 为每一个棋盘上存在的棋子绘制一个圆形阴影 */
		        shadowPath.addOval(
		          Rect.fromCenter(center: pos, width: pieceSide, height: pieceSide),
		        );
		      }
		    }

		    canvas.drawShadow(shadowPath, Colors.black, 2, true); //绘制黑色的厚度为 2dp 的棋子阴影
    ...
		  }
这一步部,我们将每个棋子的位置计算好,并添加到一个叫 piecesToDraw 的列表中了。顺便地,还把所有棋子的位置的阴影路径添加了一个 Path 之中,并进行了一次性的棋子阴影绘制。
现在我们执行绘制动作的第二步 — 棋子绘制:
static doPaint(
		    Canvas canvas,
		    Paint paint, {
		    Phase phase, //局面
		    double gridWidth, //横盘上线格的总宽度
		    double squareSide, //每个格子的边长
		    double pieceSide,
		    double offsetX,
		    double offsetY,
		  }) {
		    //
		    ...

		    paint.style = PaintingStyle.fill;

		    final textStyle = TextStyle(
		      color: ColorConsts.PieceTextColor,
		      fontSize: pieceSide * 0.8, //棋的字为棋子的大小80%
		      height: 1.0,
		    );

		    /* 逐个绘制棋子 */
		    piecesToDraw.forEach((pps) {
		      paint.color = Piece.isRed(pps.piece)
		          ? ColorConsts.RedPieceBorderColor
		          : ColorConsts.BlackPieceBorderColor; //判断是画红色的棋子还是黑色

		      canvas.drawCircle(pps.pos, pieceSide / 2, paint); //绘制棋子的圆边界

		      paint.color = Piece.isRed(pps.piece)
		          ? ColorConsts.RedPieceColor
		          : ColorConsts.BlackPieceColor;

		      canvas.drawCircle(pps.pos, pieceSide * 0.8 / 2, paint); //绘制棋子的内部圆

		      final textSpan = TextSpan(text: Piece.Names[pps.piece], style: textStyle);
		      final textPainter = TextPainter(
		        text: textSpan,
		        textDirection: TextDirection.ltr,
		      )..layout();

		      final metric =
		          textPainter.computeLineMetrics()[0]; //计算字体的 Metrics,包含相应字体的 Baseline

		      final textSize = textPainter.size; //测量文字的尺寸

		      //从顶上算,文字的 Baseline 在 2/3 高度线上
		      final textOffset = pps.pos -
		          Offset(textSize.width / 2, metric.baseline - textSize.height / 3);

		      textPainter.paint(canvas, textOffset);
		    });
		  }
对于第一步已标定好位置并添加到 piecesToDraw 列表的每个棋子,这里进行了循环绘制工作,步骤和前文所述一致。
棋子绘绘制部分的工作就绪了。我们需要对 BoardWidget 进行必要的调整,以呈现一个初始棋盘的样子。
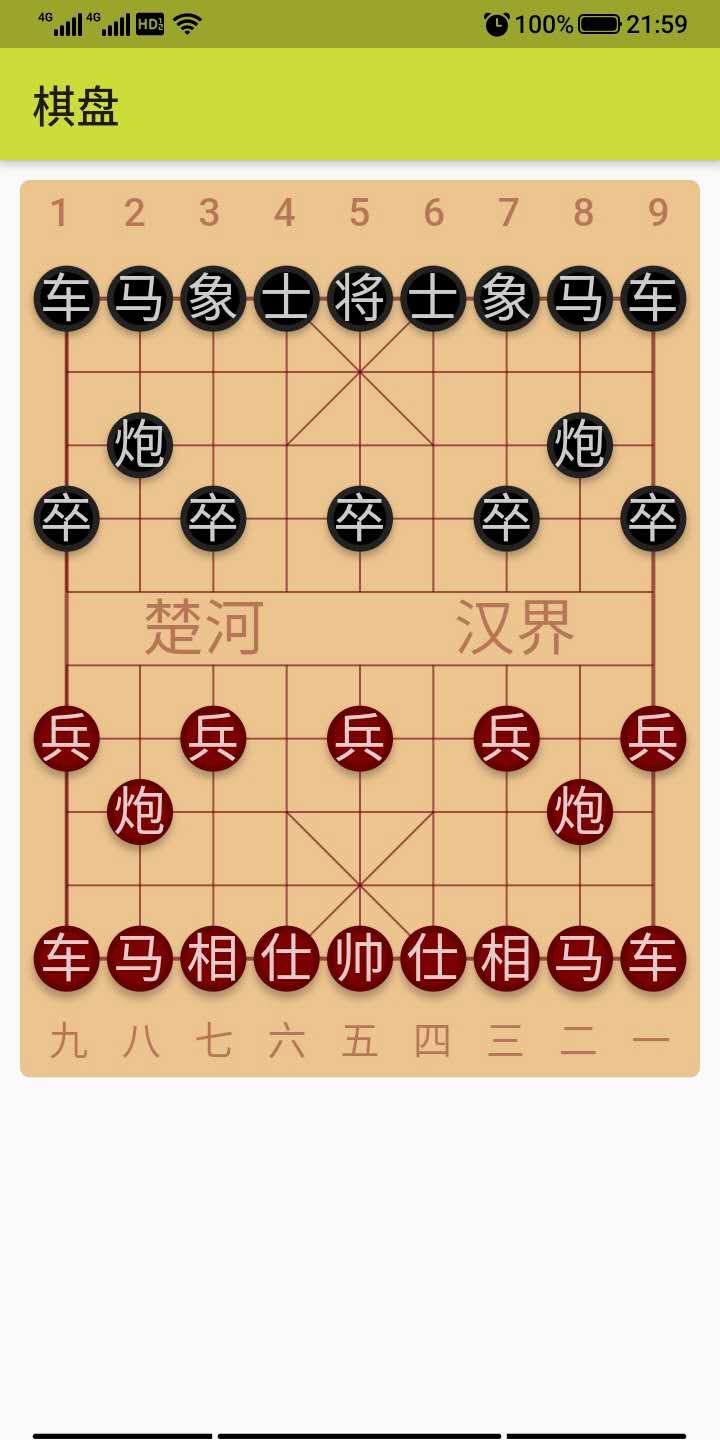
棋盘初始局面
这里有一个问题需要思考:棋盘局面的初始状态从何而来?
这是我们将来要面对的问题!目前我们简单地使用用一个预置的棋盘数组,来暂回避一下这个问题!
在 Phase 类中,我们添加一个命名为 defaultPhase 命名构造方法,在这个构造方法,我们手工布局一个初始的象棋开局棋子局面:
...

		class Phase {
		  //
		  ...

		  Phase.defaultPhase() {
		    //
		    _side = Side.Red;
		    _pieces = List(90);

		    // 从上到下,棋盘第一行
		    _pieces[0 * 9 + 0] = Piece.BlackRook;
		    _pieces[0 * 9 + 1] = Piece.BlackKnight;
		    _pieces[0 * 9 + 2] = Piece.BlackBishop;
		    _pieces[0 * 9 + 3] = Piece.BlackAdvisor;
		    _pieces[0 * 9 + 4] = Piece.BlackKing;
		    _pieces[0 * 9 + 5] = Piece.BlackAdvisor;
		    _pieces[0 * 9 + 6] = Piece.BlackBishop;
		    _pieces[0 * 9 + 7] = Piece.BlackKnight;
		    _pieces[0 * 9 + 8] = Piece.BlackRook;

		    // 从上到下,棋盘第三行
		    _pieces[2 * 9 + 1] = Piece.BlackCanon;
		    _pieces[2 * 9 + 7] = Piece.BlackCanon;

		    // 从上到下,棋盘第四行
		    _pieces[3 * 9 + 0] = Piece.BlackPawn;
		    _pieces[3 * 9 + 2] = Piece.BlackPawn;
		    _pieces[3 * 9 + 4] = Piece.BlackPawn;
		    _pieces[3 * 9 + 6] = Piece.BlackPawn;
		    _pieces[3 * 9 + 8] = Piece.BlackPawn;

		    // 从上到下,棋盘第十行
		    _pieces[9 * 9 + 0] = Piece.RedRook;
		    _pieces[9 * 9 + 1] = Piece.RedKnight;
		    _pieces[9 * 9 + 2] = Piece.RedBishop;
		    _pieces[9 * 9 + 3] = Piece.RedAdvisor;
		    _pieces[9 * 9 + 4] = Piece.RedKing;
		    _pieces[9 * 9 + 5] = Piece.RedAdvisor;
		    _pieces[9 * 9 + 6] = Piece.RedBishop;
		    _pieces[9 * 9 + 7] = Piece.RedKnight;
		    _pieces[9 * 9 + 8] = Piece.RedRook;

		    // 从上到下,棋盘第八行
		    _pieces[7 * 9 + 1] = Piece.RedCanon;
		    _pieces[7 * 9 + 7] = Piece.RedCanon;

		    // 从上到下,棋盘第七行
		    _pieces[6 * 9 + 0] = Piece.RedPawn;
		    _pieces[6 * 9 + 2] = Piece.RedPawn;
		    _pieces[6 * 9 + 4] = Piece.RedPawn;
		    _pieces[6 * 9 + 6] = Piece.RedPawn;
		    _pieces[6 * 9 + 8] = Piece.RedPawn;

		    // 其它位置全部填空
		    for (var i = 0; i < 90; i++) {
		      _pieces[i] ??= Piece.Empty;
		    }
		  }

		  ...
		}
在 BoardWidget 中,我们将 CustomPaint 的 foregroundPainter 指为我们的 PiecesPainter 类的实例;在 PiecesPainter 类的创建过程,我直接创建一个 Phase 类的实例,如下边的代码所示:
import 'package:flutter/material.dart';
		import '../common/color-consts.dart';
		import 'board-painter.dart';
		import 'words-on-board.dart';
		import 'pieces-painter.dart';
		import '../cchess/phase.dart';

		class BoardWidget extends StatelessWidget {
		  static const Padding = 5.0, DigitsHeight = 36.0; //棋盘内边界 + 棋盘上的路数指定文字高度
		  final double width, height; //棋盘宽与高

		  /* 由于横盘上的小格子都是正方形,因素宽度确定后,棋盘的高度也就确定了 */
		  BoardWidget({@required this.width})
		      : height = (width - Padding * 2) / 9 * 10 + (Padding + DigitsHeight) * 2;

		  @override
		  Widget build(BuildContext context) {
		    return Container(
		      width: width,
		      height: height,
		      decoration: BoxDecoration(
		        borderRadius: BorderRadius.circular(5),
		        color: ColorConsts.BoardBackground,
		      ),
		      child: CustomPaint(
		        painter: BoardPainter(width: width), //背景一层绘制横盘上的线格
		        /* 前景一层绘制棋子 */
		        foregroundPainter: PiecesPainter(
		          width: width,
		          phase: Phase.defaultPhase(),
		        ),
		        /* CustomPaint 的 child 用于布置其上的子组件,这里放置是我们的「河界」、「路数」等文字信息 */
		        child: Container(
		          margin: EdgeInsets.symmetric(
		            vertical: Padding,
		            horizontal: (width - Padding * 2) / 9 / 2 +
		                Padding -
		                WordsOnBoard.DigitsFontSize / 2,
		          ),
		          child: WordsOnBoard(),
		        ),
		      ),
		    );
		  }
		}
到这里,我们检查一下开发成果,在 vscode 中按F5键运行产品看看效果:
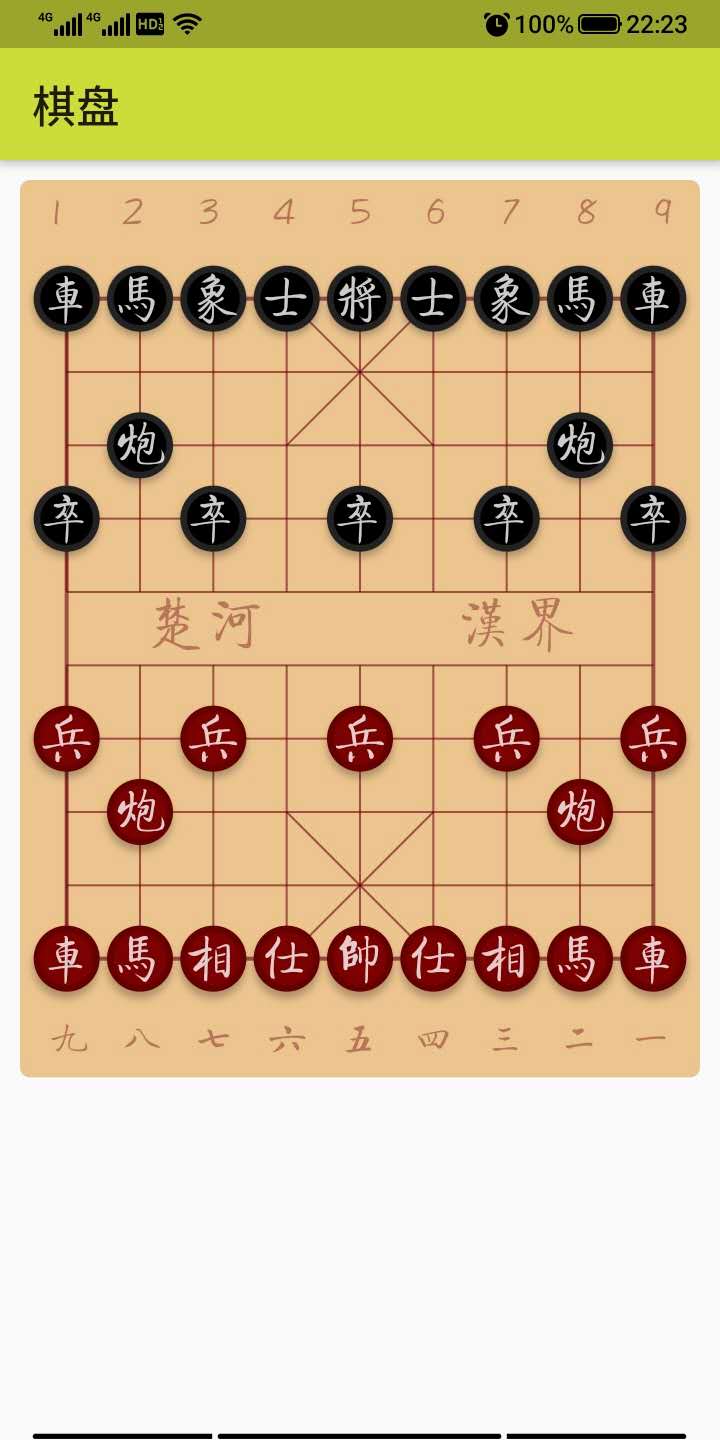
使用中国风字体
到目前为止,其它都还好,只是有一样:
现在我们在图片看到的文字都是系统默认的字体,有点呆板!我们需要找到一个适合象棋棋子显示的美观字体,然后用它来绘制棋子和棋盘上的「路数」、「河界」等提示性文字。
这件事件做起来不难:但首先我们需要找到自己喜欢的字体,并将其添加到我们的项目中。
出于演示目的,我直接在网络上下载了「方正启体」,你们可以从这里下载它。
请大家支持正版,保持知识产权!
我们在项目根目录下,新建一个 fonts 文件夹,并将你的字体文件复制到此文件夹下。然后在项目根目录下的 pubspec.yaml 文件中添加你的自定义字体:
name: chessroad
		description: A new Flutter project.

		version: 1.0.0+1

		environment:
		sdk: ">=2.1.0 <3.0.0"

		dependencies:
		  flutter:
		    sdk: flutter

		  cupertino_icons: ^0.1.2

		dev_dependencies:
		  flutter_test:
		    sdk: flutter

		flutter:

		  uses-material-design: true

		   # assets:
		   # - images/a_dot_burr.jpeg
		   # - images/a_dot_ham.jpeg

		  fonts:
		    - family: QiTi
		      fonts:
		        - asset: fonts/qiti.ttf
添加 yaml 配置后,即可使用自定义的字体。
记住:只有被注册到 pubspec.yaml 中的资源,进行应用打包时才会自动地包含在应用包内。
我们在 PiecesPainter 类的 doPaint 方法中找到棋子上的文字的样式定义,修改前是这样的:
...
		final textStyle = TextStyle(
		  color: ColorConsts.PieceTextColor,
		  fontSize: pieceSide * 0.8,
		  height: 1.0,
		);
		...
添加 fontFamily 之后,修改为:
...
		final textStyle = TextStyle(
		  color: ColorConsts.PieceTextColor,
		  fontSize: pieceSide * 0.8,
		  fontFamily: 'QiTi',
		  height: 1.0,
		);
		...
棋子的字体修改完之后,别忘了棋盘上的「路数」数字和「河界」提示文字的字体。
在 WordsOnBoard 类的实现代码中,我们找到以下这一段:
   return DefaultTextStyle(
		     child: Column(
		       children: [
		         Row(children: bChildren),
		         Expanded(child: SizedBox()),
		         riverTips,
		         Expanded(child: SizedBox()),
		         Row(children: rChildren),
		      ],
		    ),
		     style: TextStyle(color: ColorConsts.BoardTips),
		  );
在默认文字模式中,添加对 fontMamily 的指定,修改后的样子:
   return DefaultTextStyle(
		     child: Column(
		       children: [
		         Row(children: bChildren),
		         Expanded(child: SizedBox()),
		         riverTips,
		         Expanded(child: SizedBox()),
		         Row(children: rChildren),
		      ],
		    ),
		     style: TextStyle(color: ColorConsts.BoardTips, fontFamily: 'QiTi'),
		  );
添加字体后,需要重新运行一下产品。现在看看是不是美观多了?
将代码提交到 git,然后休息一下!
		elapse@elapse-PC:~/Language/Flutter/chinese_chess$ git add .
		elapse@elapse-PC:~/Language/Flutter/chinese_chess$ git commit -m '绘制棋子'
		[master 8c71acb] 绘制棋子
		 89 files changed, 2873 insertions(+)
		 create mode 100644 .gitignore
		 create mode 100644 .metadata
		 create mode 100644 FETCH_HEAD
		 create mode 100644 HEAD
		 create mode 100644 android/.gitignore
		 create mode 100644 android/app/build.gradle
		 create mode 100644 android/app/src/debug/AndroidManifest.xml
		 create mode 100644 android/app/src/main/AndroidManifest.xml
		 create mode 100644 android/app/src/main/kotlin/com/example/chinese_chess/MainActivity.kt
		 create mode 100644 android/app/src/main/res/drawable/launch_background.xml
		 create mode 100644 android/app/src/main/res/mipmap-hdpi/ic_launcher.png
		 create mode 100644 android/app/src/main/res/mipmap-mdpi/ic_launcher.png
		 create mode 100644 android/app/src/main/res/mipmap-xhdpi/ic_launcher.png
		 create mode 100644 android/app/src/main/res/mipmap-xxhdpi/ic_launcher.png
		 create mode 100644 android/app/src/main/res/mipmap-xxxhdpi/ic_launcher.png
		 create mode 100644 android/app/src/main/res/values/styles.xml
		 create mode 100644 android/app/src/profile/AndroidManifest.xml
		 create mode 100644 android/build.gradle
		 create mode 100644 android/gradle.properties
		 create mode 100644 android/gradle/wrapper/gradle-wrapper.properties
		 create mode 100644 android/settings.gradle
		 create mode 100644 config
		 create mode 100644 description
		 create mode 100644 fonts/chess.ttf
		 create mode 100755 hooks/applypatch-msg.sample
		 create mode 100755 hooks/commit-msg.sample
		 create mode 100755 hooks/fsmonitor-watchman.sample
		 create mode 100755 hooks/post-update.sample
		 create mode 100755 hooks/pre-applypatch.sample
		 create mode 100755 hooks/pre-commit.sample
		 create mode 100755 hooks/pre-merge-commit.sample
		 create mode 100755 hooks/pre-push.sample
		 create mode 100755 hooks/pre-rebase.sample
		 create mode 100755 hooks/pre-receive.sample
		 create mode 100755 hooks/prepare-commit-msg.sample
		 create mode 100755 hooks/update.sample
		 create mode 100644 info/exclude
		 create mode 100644 ios/.gitignore
		 create mode 100644 ios/Flutter/AppFrameworkInfo.plist
		 create mode 100644 ios/Flutter/Debug.xcconfig
		 create mode 100644 ios/Flutter/Release.xcconfig
		 create mode 100644 ios/Runner.xcodeproj/project.pbxproj
		 create mode 100644 ios/Runner.xcodeproj/project.xcworkspace/contents.xcworkspacedata
		 create mode 100644 ios/Runner.xcodeproj/project.xcworkspace/xcshareddata/IDEWorkspaceChecks.plist
		 create mode 100644 ios/Runner.xcodeproj/project.xcworkspace/xcshareddata/WorkspaceSettings.xcsettings
		 create mode 100644 ios/Runner.xcodeproj/xcshareddata/xcschemes/Runner.xcscheme
		 create mode 100644 ios/Runner.xcworkspace/contents.xcworkspacedata
		 create mode 100644 ios/Runner.xcworkspace/xcshareddata/IDEWorkspaceChecks.plist
		 create mode 100644 ios/Runner.xcworkspace/xcshareddata/WorkspaceSettings.xcsettings
		 create mode 100644 ios/Runner/AppDelegate.swift
		 create mode 100644 ios/Runner/Assets.xcassets/AppIcon.appiconset/Contents.json
		 create mode 100644 ios/Runner/Assets.xcassets/AppIcon.appiconset/[email protected]
		 create mode 100644 ios/Runner/Assets.xcassets/AppIcon.appiconset/[email protected]
		 create mode 100644 ios/Runner/Assets.xcassets/AppIcon.appiconset/[email protected]
		 create mode 100644 ios/Runner/Assets.xcassets/AppIcon.appiconset/[email protected]
		 create mode 100644 ios/Runner/Assets.xcassets/AppIcon.appiconset/[email protected]
		 create mode 100644 ios/Runner/Assets.xcassets/AppIcon.appiconset/[email protected]
		 create mode 100644 ios/Runner/Assets.xcassets/AppIcon.appiconset/[email protected]
		 create mode 100644 ios/Runner/Assets.xcassets/AppIcon.appiconset/[email protected]
		 create mode 100644 ios/Runner/Assets.xcassets/AppIcon.appiconset/[email protected]
		 create mode 100644 ios/Runner/Assets.xcassets/AppIcon.appiconset/[email protected]
		 create mode 100644 ios/Runner/Assets.xcassets/AppIcon.appiconset/[email protected]
		 create mode 100644 ios/Runner/Assets.xcassets/AppIcon.appiconset/[email protected]
		 create mode 100644 ios/Runner/Assets.xcassets/AppIcon.appiconset/[email protected]
		 create mode 100644 ios/Runner/Assets.xcassets/AppIcon.appiconset/[email protected]
		 create mode 100644 ios/Runner/Assets.xcassets/AppIcon.appiconset/[email protected]
		 create mode 100644 ios/Runner/Assets.xcassets/LaunchImage.imageset/Contents.json
		 create mode 100644 ios/Runner/Assets.xcassets/LaunchImage.imageset/LaunchImage.png
		 create mode 100644 ios/Runner/Assets.xcassets/LaunchImage.imageset/[email protected]
		 create mode 100644 ios/Runner/Assets.xcassets/LaunchImage.imageset/[email protected]
		 create mode 100644 ios/Runner/Assets.xcassets/LaunchImage.imageset/README.md
		 create mode 100644 ios/Runner/Base.lproj/LaunchScreen.storyboard
		 create mode 100644 ios/Runner/Base.lproj/Main.storyboard
		 create mode 100644 ios/Runner/Info.plist
		 create mode 100644 ios/Runner/Runner-Bridging-Header.h
		 create mode 100644 lib/board/board-painter.dart
		 create mode 100644 lib/board/board-widget.dart
		 create mode 100644 lib/board/painter-base.dart
		 create mode 100644 lib/board/pieces-painter.dart
		 create mode 100644 lib/board/words-on-board.dart
		 create mode 100644 lib/cchess/cc-base.dart
		 create mode 100644 lib/cchess/phase.dart
		 create mode 100644 lib/common/color-consts.dart
		 create mode 100644 lib/main.dart
		 create mode 100644 lib/routes/battle-page.dart
		 create mode 100644 objects/pack/tmp_pack_HxlCBe
		 create mode 100644 pubspec.lock
		 create mode 100644 pubspec.yaml
		 create mode 100644 test/widget_test.dart
		elapse@elapse-PC:~/Language/Flutter/chinese_chess$ sudo git push
		Username for 'https://rocketgit.com': elapse
		Password for 'https://[email protected]':
		枚举对象: 125, 完成.
		对象计数中: 100% (125/125), 完成.
		使用 4 个线程进行压缩
		压缩对象中: 100% (98/98), 完成.
		写入对象中: 100% (124/124), 5.17 MiB | 41.00 KiB/s, 完成.
		总共 124 (差异 4),复用 0 (差异 0)
		remote: RocketGit: Info: == Welcome to RocketGit! ==
		remote: RocketGit: Info: you are connecting from IP 2408:8256:686:75d1:4ca8:d3c7:9e54:8d1 by http(s).
		remote: RocketGit: Info: date/time: 2020-08-25 01:41:53 (UTC), debug id bd5235.
		remote: Resolving deltas: 100% (4/4), done.
		To https://rocketgit.com/user/elapse/chinese_chess
		   2cb5c8c..8c71acb  master -> master
		elapse@elapse-PC:~/Language/Flutter/chinese_chess$
我们将才干了一个大活,需要给自己一点犒赏!
本节回顾
本节课程中,我们解决了两个主要的问题,一个是如何管理棋盘的局面 — 棋子的位置管理。另一个是如何在指定的位置绘制棋子。
除此之外,我们还导入了第三方字体,以美化棋子上的文字效果。
这一具有几个需要提示大家特别注意:
- 使用 Canvas 可以绘制自定义的阴影,在调用 Canvas 绘制前,你需要将它们添加到一个表示阴影的 Path 对象中,因此多个棋子的阴影可以一次性绘制。
- 如果你希望给一颗棋子绘制阴影,那么应该先绘制阴影效果,之后在阴影之上绘制棋子,这个层次关系不能错。
- Canvas 并不能直接绘制文本,它需要借助 TextPainter 类来配置文字风格、并布局文字。
- 如果要将文字绘制到指定的区域,需要理解文字 BaseLine 的知识。